
For the Whipped Filling (The “Musketeer” Center):
1 cup (240ml) heavy cream (must be cold)
4 oz (113g) cream cheese, softened to room temperature
½ cup (60g) powdered erythritol or allulose (confectioners-style – regular granular sweetener will be gritty)
1 teaspoon vanilla extract
Pinch of salt
For the Chocolate Coating:
6 oz (170g) sugar-free dark chocolate (Lily’s, ChocZero, or Bake Believe – choose a brand you like eating plain)
1 tablespoon coconut oil or cacao butter (thins the chocolate for dipping)
Substitutions & Swaps:
No heavy cream? Use full-fat coconut cream (chilled overnight, use only the solid part). The texture will be slightly different but still good.
No cream cheese? This is harder to substitute. You can try mascarpone (richer, softer) or skip it and use stabilized whipped cream (add ½ teaspoon gelatin).
No powdered sweetener? Grind granular allulose or erythritol in a coffee grinder or food processor until it becomes a fine powder. Do not skip this – regular granular sweetener will make the filling gritty.
Dairy-free: Use coconut cream (solid part) and dairy-free cream cheese (Miyoko’s or Violife). The texture will be slightly softer.
Different chocolate: Use sugar-free milk chocolate if you prefer a sweeter, creamier coating. Use a mix of dark and milk chocolate.
Step-by-Step – From Bowl to Bite
Step 1: Prepare Your Workspace
Line a small baking sheet or plate with parchment paper or a silicone baking mat. You need a flat surface that fits in your freezer.
Step 2: Whip the Heavy Cream
In a large, cold mixing bowl (chill the bowl and beaters in the freezer for 10 minutes if possible), pour the cold heavy cream. Whip with an electric mixer on medium-high speed until stiff peaks form.
The texture test: When you lift the beaters, the cream should stand up straight, not flop over. This takes about 2-3 minutes. Do not over-whip (it will turn into butter).
Step 3: Beat the Cream Cheese
In a separate bowl, beat the softened cream cheese with the powdered sweetener, vanilla extract, and salt until smooth, creamy, and completely lump-free.
Pro tip: Make sure the cream cheese is truly room temperature. Cold cream cheese will not blend smoothly, and you’ll end up with lumps in your filling.
Step 4: Combine and Fold
Add the whipped cream to the cream cheese mixture. Fold gently with a rubber spatula until no white streaks remain. Do not stir vigorously – you’ll deflate the whipped cream and lose the airy texture.
The texture test: The mixture should be light, fluffy, and mousse-like. If it’s dense or grainy, you either over-mixed or your sweetener wasn’t powdered.
Step 5: Shape the Filling
Spoon or pipe the mixture onto your prepared parchment-lined baking sheet. You have two options:
Traditional bars: Pipe or spoon into 3-inch long, 1-inch wide oblong shapes (about 1 tablespoon each).
Bite-sized pieces: Spoon into small mounds (about 1 teaspoon each) for mini “Musketeer bites.”
Pro tip: Wet your fingers slightly. Lightly shape the mounds into smooth, rounded domes. The smoother the surface, the cleaner the chocolate coating will look.
Step 6: Freeze (Critical Step)
Place the baking sheet in the freezer for at least 2 hours – overnight is even better. The filling must be completely solid before dipping.
Why this matters: If the filling isn’t frozen solid, it will fall apart when you try to dip it in warm chocolate. Don’t rush this step.
Step 7: Melt the Chocolate
About 10 minutes before you’re ready to dip, melt the sugar-free chocolate and coconut oil together. You can do this in:
Microwave: 30 seconds, stir. Repeat in 15-second intervals until smooth. Do not overheat (chocolate seizes when too hot).
Double boiler: Simmer water in a saucepan, place a heatproof bowl over the water (bowl should not touch the water), and stir until melted.
Let the melted chocolate cool slightly – it should be warm but not hot. If it’s too hot, it will melt the frozen filling.
Step 8: Dip the Frozen Filling
Remove the frozen filling pieces from the freezer. Work quickly.
Using a fork or a dipping tool, drop one frozen piece into the melted chocolate. Turn to coat completely. Lift out with the fork, tap gently to remove excess chocolate, and place back on the parchment-lined sheet.
Pro tip: If the chocolate starts to thicken as you work, reheat it gently for 10 seconds in the microwave.
Step 9: Chill Again
Return the dipped candies to the freezer for 15-30 minutes, until the chocolate is completely set and firm.
Step 10: Enjoy (And Try Not to Eat Them All at Once)
Remove from the freezer. Let sit at room temperature for 2-3 minutes before eating. The filling should be creamy and soft, not frozen solid.
Store leftovers in the refrigerator or freezer (see below).
My Best Tips for Keto Musketeer Success
Use powdered sweetener. Granular sweetener will make the filling gritty. If you only have granular, grind it into a powder using a coffee grinder or food processor.
Chill everything. Cold bowl, cold beaters, cold cream. The whipped cream will whip faster and hold its shape better.
Don’t over-whip the cream. Stiff peaks are the goal. If you keep going, the cream will break and turn into butter. If this happens, start over.
Freeze the filling solid. At least 2 hours. Overnight is better. If the filling is even slightly soft, it will fall apart when you dip it.
Work quickly when dipping. The frozen filling will start to thaw the moment it hits the warm chocolate. Have everything set up before you start.
Use a fork, not a toothpick. A fork gives you better control and allows excess chocolate to drip off.
Don’t worry about perfection. These are homemade candies. A few ridges, a slightly uneven coating – that’s character. They’ll still taste incredible.
Why This Mimics the Original So Well
Let me geek out for a second.
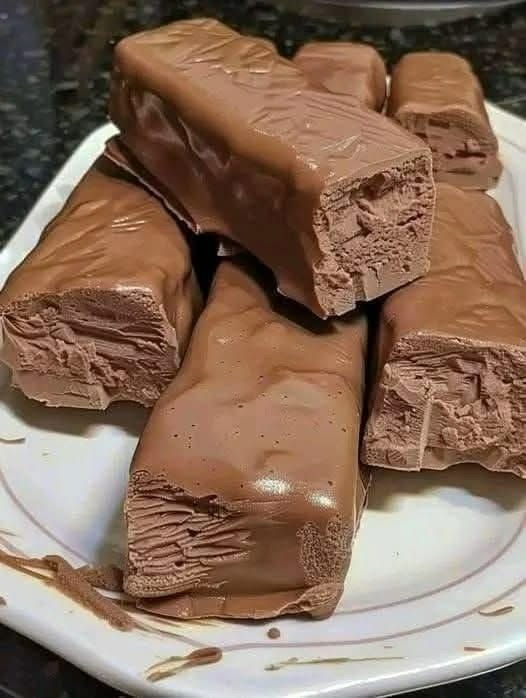
The original 3 Musketeers bar has a whipped, nougat-like center that’s light and airy. That texture comes from whipped egg whites and corn syrup – not exactly keto-friendly.
This version uses whipped cream and cream cheese to achieve a similar lightness. The whipped cream provides air and volume. The cream cheese provides structure and a slight tang that balances the sweetness. The result is a filling that’s creamy, airy, and nothing like the dense, greasy “fat bombs” that pass for keto candy elsewhere.
The sugar-free chocolate coating (with a little coconut oil) creates a thin, crisp shell that shatters when you bite into it – exactly like the original.
It’s not identical. I won’t pretend it is. But it’s close enough that my non-keto husband ate three before I told him they were sugar-free.
Nutritional Information (Per Piece – Makes About 12 Pieces)
Nutrient Amount
Calories 140-160
Fat 14-16g
Protein 2-3g
Total Carbs 4-6g
Fiber 2-3g
Sugar Alcohols 2-4g
Net Carbs 1-2g
Note: Nutrition varies based on specific chocolate and sweetener brands. Always calculate based on your ingredients.
Fun Variations (Once You’ve Mastered the Original)
Peanut Butter Musketeer – Add 2 tablespoons powdered peanut butter (PB2) to the cream cheese mixture. The flavor is subtle but unmistakable.
Mint Chocolate Musketeer – Add ¼ teaspoon peppermint extract to the filling. Use dark chocolate for coating. Crush one sugar-free peppermint candy on top before the chocolate sets.
For Complete Cooking STEPS Please Head On Over To Next Page Or Open button (>) and don’t forget to SHARE with your Facebook friends
ADVERTISEMENT

